客户 ↔ 组
您的组织不断发展,在某些时候将权限分配给各个用户是不切实际的,您需要将权限分配给客户的所有客户用户。
OTRS允许您为一个 客户 分配 组 权限。 与服务人员的访问方式相同,可防止客户修改和查看一个请求。 因此,允许客户专注于原始通信的结果,并通过一张工单汇集讨论。
参见
通过 客户用户 ↔ 组 将单个客户用户分配到一个组。
使用此屏幕将一个或多个客户添加到一个或多个组。 要使用此功能,需要至少将一个客户和一个组添加到系统中。 管理屏幕位于 用户、组和角色 组的 客户 ↔ 组 模块中。
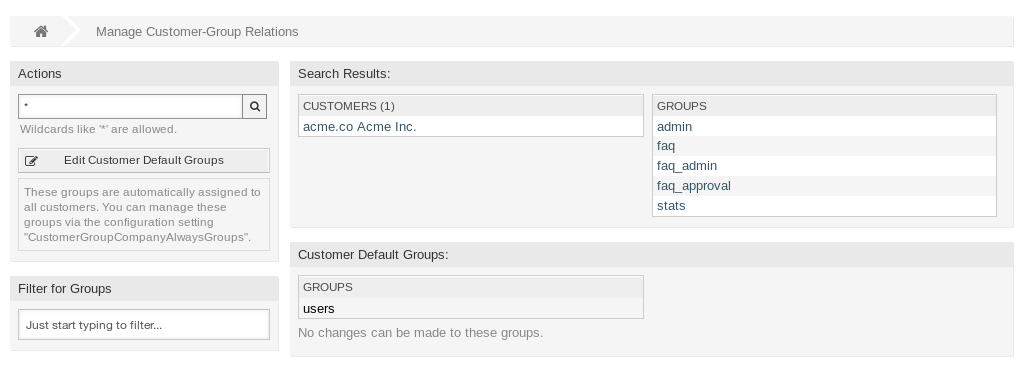
管理客户-组的关联
需要在至少一个客户用户 后端 启用客户组支持才能使用此功能。 对于默认的OTRS 后端,可以通过在系统配置中点击 在这里启用! 按钮启用它。
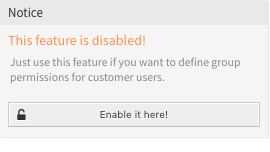
启用客户组功能
注解
要在使用目录服务器或多个非默认后端的系统中启用此功能,需要将自定义配置文件放在 Kernel/Config/Files 中(例如名为 ZZZ_CustomerBackend.pm)。 激活后,此后端的所有客户用户都需要分组。
警告
更改后端后,将删除服务器缓存,这可能会导致性能暂时下降。
管理客户 ↔ 组关联
注解
To be able to use this feature, you have to activate the CustomerGroupSupport setting.
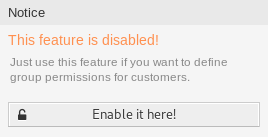
启用客户-组支持
若要将一些组分配给一个客户:
- 点击 客户 列表中的一个客户。
- 选择要将客户连接到组的权限。
- 点击 保存 或 保存并完成 按钮。

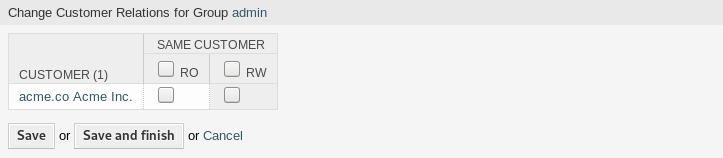
修改客户关联的组
若要将某些客户分配给一个组:
- 点击 组 列中的一个组。
- 选择要将组连接到客户的权限。
- 点击 保存 或 保存并完成 按钮。
修改组关联的客户
若要修改客户的默认组:
- 单击左侧栏中的 编辑客户的默认组 按钮。
- Add or modify groups in setting CustomerGroupCompanyAlwaysGroups.
- 部署修改后的系统配置。
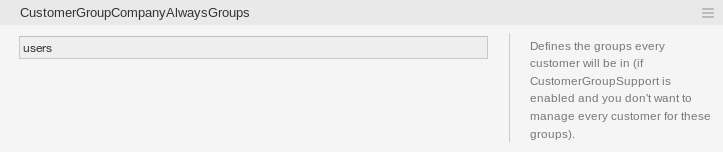
CustomerGroupCompanyAlwaysGroups 系统配置屏幕
这些组会自动分配给所有客户。
注解
如果系统中添加了多个客户或组,请使用搜索框查找特定客户,或使用过滤器框通过键入要过滤的名称来查找特定组。
可以在两个屏幕中同时分配多个客户或组。 另外,在关联屏幕中点击客户或组将相应地打开*编辑客户*屏幕或*编辑组*屏幕。
警告
访问客户或组不提供到关联屏幕的返回链接。
客户 ↔ 组关联参考
When assigning a customer to a group or vice versa, several permissions can be set as connection between a customer and a group. Group permissions will be inherited by all customer users of the customer. Different contexts of permission assignment are available, which will determine how the permissions are inherited by customer users.
The following contexts are available:
- 同一客户
给客户用户授予对来自同一单位的客户用户的工单(工单的客户ID等于客户用户的客户ID)基于组的访问权限。
注解
This feature is enabled by default. You can disable it via the
CustomerGroupPermissionContext###001-CustomerID-samesetting.- Other Customers
Provides customer users access to tickets even if the tickets are not assigned to a customer user of the same customer ID(s), based on permission groups.
注解
To be able to use this feature, you have to activate the
CustomerGroupPermissionContext###100-CustomerID-othersetting.
The following permissions are available by default:
- ro(只读)
- 对该资源的只读访问权限。
- rw(读写)
- 对该资源的完全读写访问权限。
参见
Not all available permissions are shown by default. See System::Customer::Permission setting for permissions that can be added. This additional permission can be added:
- create(创建)
- Permission to create a ticket.
注解
通过设置列标题中的复选框,将设置所选列中的所有复选框。通过设置最后一个 rw 列中的复选框,将设置所选行中的所有复选框。
Permission Functionality Example
Access to tickets on the external interface with enabled group support is mostly evaluated by a combination of group and individual (customer/customer user based) permission. Only if both criteria are met, specific access is granted.
If the resulting access is rw, a customer user can view and modify a ticket. If the access is ro only viewing is possible.
For ticket creation only the group permissions are used and a customer user can create tickets for all queues with rw permissions.
Group permissions are additive (meaning that only one method needs to grant permissions) and the following possibilities are taken into account:
- Customer user default groups via system configuration setting.
- Groups assigned to the customer user via the 客户用户 ↔ 组 screen.
- Customer default groups via system configuration setting.
- Groups assigned to the customer via the 客户 ↔ 组 screen.
For the methods above, all customers related to a customer user are used. This includes the primary customer (selected in the 客户用户 screen), additional customers (added in 客户用户 ↔ 客户 screen) and other customer that might exist in the back end.
Individual permission checks require one of the following conditions to be met:
- Ticket is assigned to the customer user.
- Ticket is assigned to a customer that the customer user is related to (as explained above).
- Ticket is assigned to a customer with group permissions for the ticket queue while a customer related to the customer user has Other Customers permission to the same group.
An example for the last item to clarify the functionality:
- Ticket is assigned to customer user Arvid Karlsson with related customer Ericsson AB.
- Ticket is located in queue Support Sweden.
- Queue Support Sweden is in group support-se.
- Customer Ericsson AB has Same Customer context with rw permission to group support-se.
- Logged in customer user is Barry Smith which is related to customer Farmers Inc..
- Customer Farmers Inc. has Same Customer context with ro permission to group support-se.
- Now, if customer Farmers Inc. is given Other Customers context with ro permission to group support-se, Barry Smith will be able to view the ticket.
- In order for Barry to modify the ticket, rw permission is required for both Same Customer and Other Customers contexts.
Multi-tier Customer Relationship
In this example we will create a multi-tier customer structure with resulting ticket permissions. To get the same results you will need a relatively clean system without many customizations.
Create the following customers in the 客户 screen:
客户ID 客户 deGraubrot AG mxHernandez SA seEricsson AB usFarmers Inc. Create the following customer users in the 客户用户 screen and assign them to the already created customers. Use any valid email address for the email field.
Firstname Lastname Username 客户ID Arvid Karlsson akEricsson AB Barry Smith bsFarmers Inc. Christian Müller cmGraubrot AG Diego Garcia dgHernandez SA Create the following groups in the 组 screen:
faq-amerfaq-emeasupport-desupport-mxsupport-sesupport-us
Go to the 队列 screen and add corresponding queues which will use the previously created groups. In the System address field you can use any available address.
名称 组 FAQ Germany faq-emeaFAQ Mexico faq-amerFAQ Sweden faq-emeaFAQ USA faq-amerSupport Germany support-deSupport Mexico support-mxSupport Sweden support-seSupport USA support-usGo to the 客户用户 ↔ 客户 screen and assign the select customer users to other customers.
客户用户 客户 活动的 Arvid Karlsson deGraubrot AGyes {1} Diego Garcia seEricsson ABusFarmers Inc.yes {2} Go to the 客户用户 ↔ 组 screen and assign a single customer user direct access to a group.
客户用户 组 Permission Diego Garcia faq-emearw {3} Go to the 客户 ↔ 组 screen and assign customers to groups according to the matrix below. Be sure to select proper permission level for each group and company.
客户 同一客户 Other Customers deGraubrot AGfaq-amer→ ro {4}faq-emea→ rosupport-de→ rwsupport-mx→ romxHernandex SAfaq-amer→ ro {5}faq-emea→ rosupport-de→ rosupport-mx→ rwsupport-de→ rw {6}support-mx→ rwseEricsson ABfaq-amer→ ro {7}faq-emea→ rosupport-se→ rwusFarmers Inc.faq-amer→ ro {8}faq-emea→ rosupport-us→ rwfaq-amer→ ro {9}
The {6} is intentional to demonstrate limitation to base permissions.
For reference, please consult the image below where all relationships are drawn as lines:
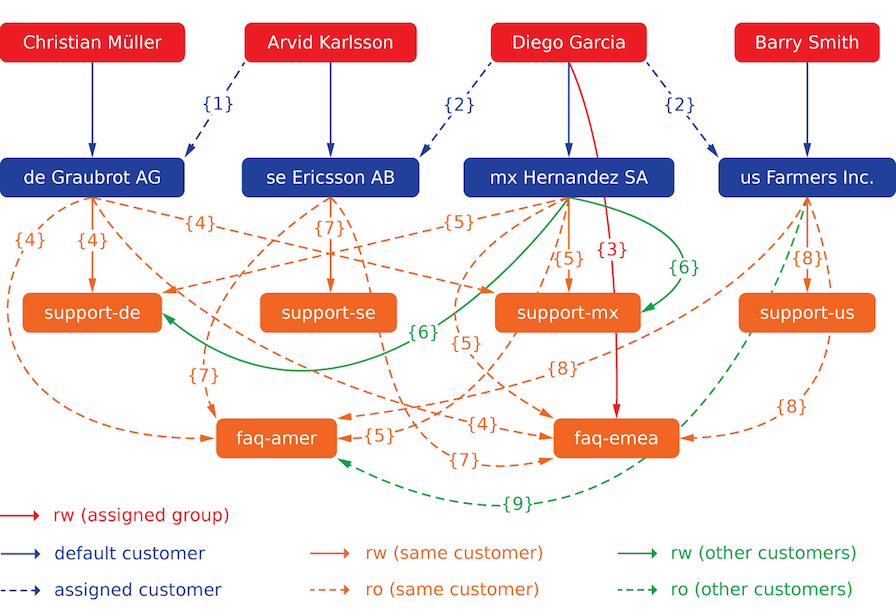
Multi-tier Customer Relationship
- Create some tickets. Go to New Phone Ticket screen and create tickets, one each per customer user and queue (32 in total). By the way, this is possible in the agent interface as the customer group restrictions are only active on the external interface.
For checking resulting access to the tickets, you can easily switch between the customer users by activating SwitchToCustomer option in the system configuration. Then just go to the 客户用户 and click on corresponding Switch to customer link next to the customer user’s name.
You will be immediately logged in as that customer user and you can visit the Company Tickets screen using the Ticket menu item for checking the ticket access. It should conform to the matrix below. Click on a ticket to check if corresponding permission level is honored: for ro permission level you should not see the Reply button.
This is the expected result for each customer user. The marker {N} refers to the location above where the corresponding setting was taken (this shows why the access is granted).
Resulting access for customer user Arvid Karlsson:
- Queue FAQ Germany: ro (via {7}) + Christian’s tickets ro (via {1})
- Queue FAQ Mexico: ro (via {7}) + Christian’s tickets ro (via {1})
- Queue FAQ Sweden: ro (via {7}) + Christian’s tickets ro (via {1})
- Queue FAQ USA: ro (via {7}) + Christian’s tickets ro (via {1})
- Queue Support Germany: rw (via {1 → 6}) + Christian’s tickets rw (via {1})
- Queue Support Mexico: -
- Queue Support Sweden: rw (via {7}) + Christian’s tickets rw (via {1})
- Queue Support USA: -
Resulting access for customer user Barry Smith:
- Queue FAQ Germany: ro (via {8})
- Queue FAQ Mexico: ro (via {8}) + Arvid’s, Christian’s, Diego’s tickets ro (via {9})
- Queue FAQ Sweden: ro (via {8})
- Queue FAQ USA: ro (via {8}) + Arvid’s, Christian’s, Diego’s tickets ro (via {9})
- Queue Support Germany: -
- Queue Support Mexico: -
- Queue Support Sweden: -
- Queue Support USA: rw (via {8})
Resulting access for customer user Christian Müller:
- Queue FAQ Germany: ro (via {4})
- Queue FAQ Mexico: ro (via {4})
- Queue FAQ Sweden: ro (via {4})
- Queue FAQ USA: ro (via {4})
- Queue Support Germany: rw (via {4})
- Queue Support Mexico: ro (via {4})
- Queue Support Sweden: -
- Queue Support USA: -
Resulting access for customer user Diego Garcia:
- Queue FAQ Germany: rw (via {3}) + Arvid’s, Barry’s tickets rw (via {2})
- Queue FAQ Mexico: ro (via {5}) + Arvid’s, Barry’s tickets ro (via {2}) + Christian’s tickets ro (via {2 → 9})
- Queue FAQ Sweden: rw (via {3}) + Arvid’s, Barry’s tickets rw (via {2})
- Queue FAQ USA: ro (via {5}) + Arvid’s, Barry’s tickets ro (via {2}) + Christian’s tickets ro (via {2 → 9})
- Queue Support Germany: ro (via {5}) + Arvid’s, Barry’s tickets ro (via {2}) + Christian’s tickets ro (via {6})
- Queue Support Mexico: rw (via {5}) + Arvid’s, Barry’s tickets rw (via {2}) + Christian’s tickets rw (via {6})
- Queue Support Sweden: rw (via {2 → 4}) + Arvid’s, Barry’s tickets rw (via {2})
- Queue Support USA: rw (via {2 → 5}) + Arvid’s, Barry’s tickets rw (via {2})